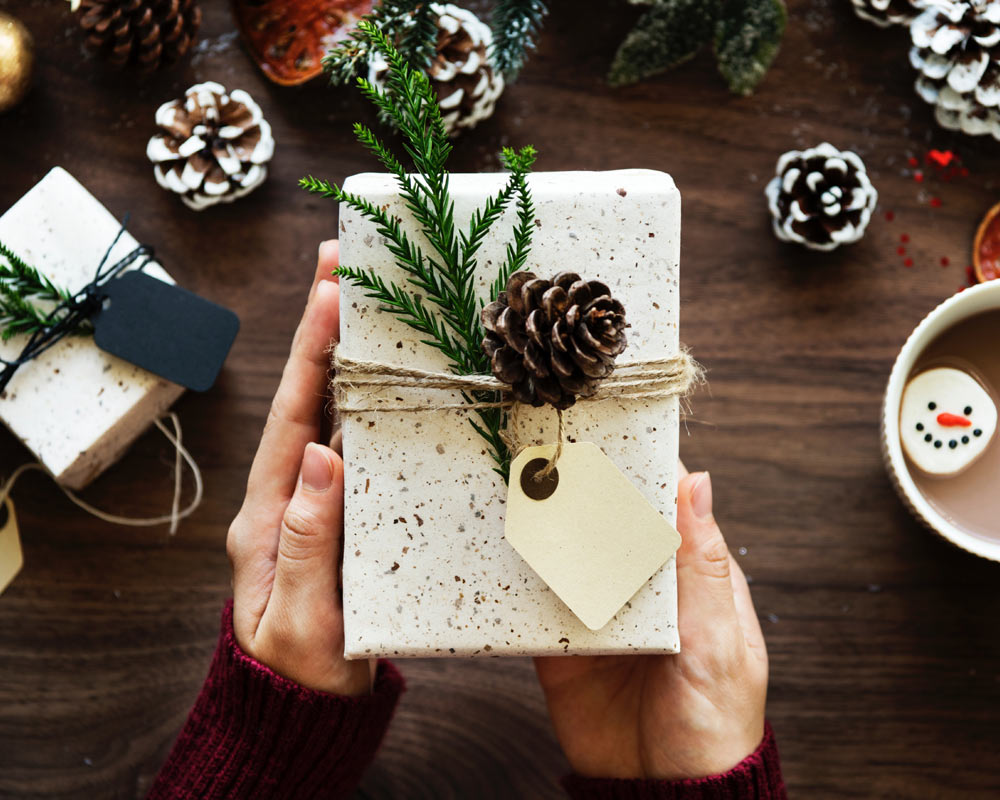
Top 7 DIY Christmas presents
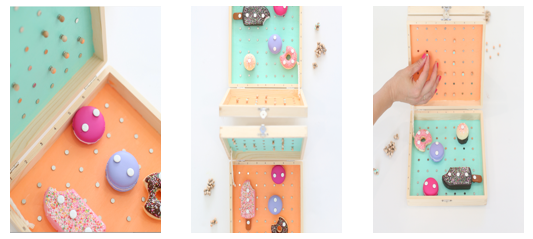
1. Battleship Sweets Game
Remember the classic board game Battleship? Well, this is a slightly different, much more fun version of it. Source: Lovely Indeed
What you will need:
N.B. You do not need to have the exact products shown via the links in the list below. The links are provided to indicate an example of what would work for this project. Feel free to get creative and put your own spin on it!
● 2 wood boxes
● Toy sweets or candy in different shapes and sizes
● Metal rivets
● E6000
● Craft Knife
● Craft Paint
● Paintbrush
● Ball point pen
● Tiny wood balls (2 sets of 100)
● Tiny magnets (2 sets of 100)
● Rope or twine
● Scissors
● Pencil
● Ruler
● Metal alphabet stamps and hammer (optional)
● Magnetic Strips (optional)
Instructions:
- 1. Paint the inside of your boxes with any colour of your choosing
- 2. Measure out a piece of paper that’s the same size as the inside of your box. Using a ruler, mark a grid of dots on the paper
- 3. Use the craft knife to poke a hole on each point
- 4. On each side of the inside of both boxes, place the grid and use the pencil to trace all the dots
- 5. Use E6000 to glue a magnet on each dot (all magnets should face the same way in their polarity to ensure that your game pieces will stick properly)
- 6. Use your metal alphabet stamp (if you want) to place a letter by each horizontal row of magnets and a number by each vertical column of magnets. You can skip this part and just write in the numbers and letters with a pen/marker
- 7. To help the boxes stay upright when the lid is open, glue a small section of rope/twine to the inside of each box
- 8. Now it’s time for your markers. Lay down as many magnets as you have in each of the lids of the boxes. Be sure to lay them down so that the polarity matches the magnets you glued on the box lids. Glue a small wooden ball to each of the magnets.
- 9. Paint 12 of the wooden balls in one colour and 12 in another colour. These will be the markers you use when you hit one of the other player’s pieces.
- 10. Add rivets to the tops of your sweets. Arrange them as you like, so long as they correspond to the magnets on the bottom half of your game. Make a slit in your game piece with a craft knife, add a dab of glue over the slit, and then sink a rivet into the slit. This way, since the rivets are metal, you can attach a magnet ball to the corresponding rivet when your opponent correctly guesses at the placement of your game piece.

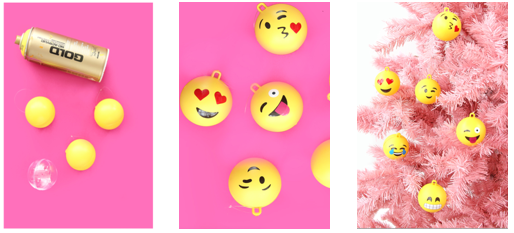
2. Emoji Ornaments
You use them when texting so why not use them on your Christmas tree? Source: A Subtle Revelry
What you will need:
● Clear big ball ornaments
● Yellow spray paint
● Fabric of your choice in red, pink, blue, white, brown and black
● Fabric glue
● Marker
● Scissors
● String or twine
Instructions:
1. Use the yellow spray paint to paint the clear ornaments yellow. Allow them to dry
2. Using a marker, draw out the required shapes for your emojis (eyes, mouth, etc). Use the scissors to cut the shapes out
3. When the paint has dried, glue the shapes you have cut out for your emojis on the ornaments
4. Tie some string or twine around the loop in the ornament and hang on your tree
Difficulty Level:

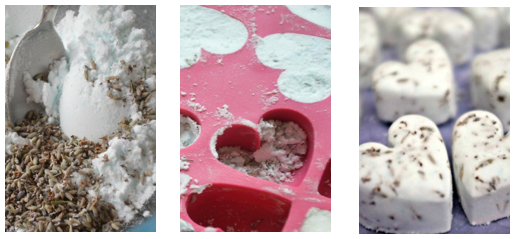
3. Bath Bombs
Lush who? Source: Red Ted Art
What you will need:
● 2 cups baking soda
● 1 cup cream of tartar
● 1-2 tablespoons of olive oil / plain oil
● Food colouring of your choice
● Essential oils (i.e. lavender)
● Water in a spray bottle
● Ice cube trays (silicon trays are the best) in any shape you like.
Instructions:
1. Mix the baking soda, tartar, oil, essential oils and food colouring until you have a colour that you are happy with
2. Spray the mixture 2-3 times with your water spray. Expect a sizzle as the baking soda reacts with the water and start mixing immediately. The mixture should start to feel a bit like wet sand. When you can indent your spoon in the mixture and leave behind a shape without the mixture crumbling a lot, you are ready to transfer the mixture to the ice cube trays
3. Fill in your ice cube trays and press down hard
4. Let dry for 1-2 days
5. When ready, remove gently
6. If you notice them breaking apart as you remove them from the mould, crumble it all again, spray with some water and start again
Difficulty Level:

4. Brownie Mix in a Jar
The perfect present for those who like to mess around in the kitchen from time to time. Source: Evermine
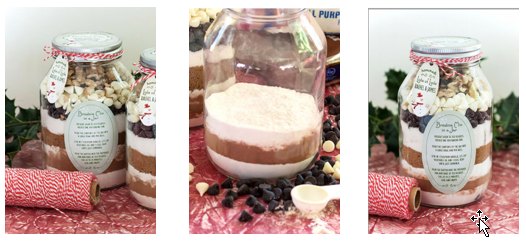
What you will need:
● 1 cup plus 2 tablespoons all-purpose flour
● ½ teaspoon salt
● ½ cup cocoa powder
● 2/3 cup brown sugar
● 2/3 cup white sugar
● 1/3 cup semi-sweet chocolate chips
● 1/3 cup white chocolate chips
● 1/3 cup chopped pecans
Instructions:
1. In a small mixing bowl, mix the flour and salt together. Then begin to layer your ingredients into our jar as follows:
a. One half of the flour/salt mixture
b. Cocoa powder
c. Remaining flour/salt mixture
d. Brown sugar
e. White sugar
f. Semi-sweet chocolate chips
g. White chocolate chips
h. Pecans
N.B. You can even attach a small card with baking instructions:
1. Preheat oven to 180°C. Grease a baking pan
2. Pour the contents of the jar into a large bowl and mix well
3. Stir in 1 teaspoon vanilla, 2/3 cup vegetable oil and three eggs. Beat until just combined
4. Pour the batter into the prepared pan and bake at 180°C for 20-25 minutes
5. Let cool and enjoy!
Difficulty Level:

5. A “Letters to You” mason jar
The best presents are always those that have a lot of thought put into it, and as they say 2+ heads are better than 1.
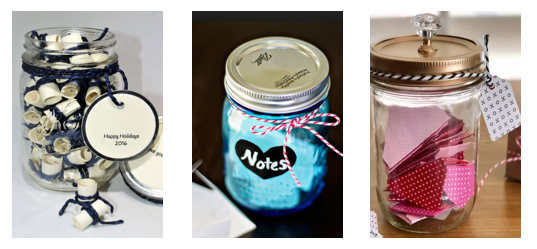
What you will need:
● A mason jar, or any other kind of clear jar with a lid
● Small pieces of paper (plain or patterned, it’s up to you!)
● Ribbon or twine
Instructions:
1. Make a list of people who will write messages/notes for the person to whom you are giving this gift (or if you prefer, you could fill the jar with notes written only by you)
2. Collect the written notes from those on your list
3. Fill jar with notes
4. Screw on the lid
5. Tie ribbon or twine around the lid to give it a festive touch
Difficulty Level:
6. DIY Cookie Snow globes
A delicious twist to a classic ornament, you will leave your friends and family amazed and delighted! Source: IHeartNaptime
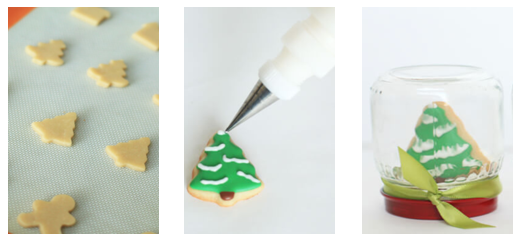
What you will need:
● Mini cookies made using your favourite cookie recipe (have a variety of Christmas shapes + some small round cookies to act as the “stand” for your ornament in the snow globe)
● Icing mixture to decorate your cookies
● Small sized clear jars (i.e. baby food jars)
● Spray paint (colour of your choosing)
● White sprinkles or other white edible decoration
Instructions:
1. Bake your cookies
2. Once your cookies have cooled, decorate with icing
3. Frost a round cookie and stick a dried and decorated cookie in the icing. Repeat this for as many snow globes as you want
4. While your cookies set, spray paint the lids of your jars in a colour of your choosing
5. Dab some icing on the jar lid to keep your cookie ornament in place. Place your cookie on the jar lid and wait for it to dry
6. Pour your white edible decorations / sprinkles in your jar
7. Screw the lid on and flip it over
Optional: tie a little ribbon around the base of the jar
Difficulty Level:

7. Smartphone Case
Phones are a huge part of our lives, so let’s show them some love. Source: Journeys
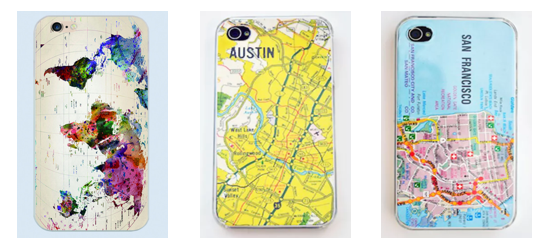
What you will need:
● Map
● Clear iPhone case
● Scissors
● Craft knife
● Pencil
● Clear glue
Instructions:
1. Cut the map to the size of your case (don’t forget the camera hole!)
2. Remember to leave a bit of room on the sides so that the map can cover the sides of your phone as well
3. Put your newly cut map into the clear case
4. Glue the sides of the map to the inner sides of your phone case
Difficulty Level: